Showing posts with label gluten free. Show all posts

Friday, 27 April 2012

Passionfruit cake with passionfruit glaze


 I have a passion for passionfruit aka granadilla aka passiflora ligulalis.  To me the taste is pure nostalgia.  Growing up in South Africa, we had a vine which used to produce so much fruit that I used to pluck them, cut them in half and squich the contents straight into my mouth.  My Mum used to make a wonderful granadilla cake, which consists of flavouring the sponge with the pulp and then adding the pulp and seeds to buttercream icing.

I had no idea that they are native to the Andes Mountains between Bolivia, Venezuela and Colombia. It grows as far south as northern Argentina and as far north as Mexico. Outside of its native range it grows in the tropical mountains of Africa and Australia, and is now common in local markets of Papua New Guinea, where it is known as 'sugar fruit'.

The taste and aroma of a ripe passionfruit is like no other.  A tonsil tickling sourness mixed with an almost indescribable tropical-ness.  They are also mega-healthy for you containing vitamins A, C, and K, phosphorous, iron and calcium.

Spring has been so grey, wet and rainy this year that summer feels like it's simply never going to get here.  So I decided to cheer myself up with a little bit of sunshine on a plate by making a passionfruit cake.

Be warned this cake is seriously passionfruity -  you'll need the pulp of 8 passionfruit.  In the UK, ASDA supermarkets nearly always have a great deal of 3 for £1.

 To make this cake follow my foolproof sponge cake recipe here and add the sieved pulp of 3 passionfruit to the mixture near the end.

To make the butter cream icing [in the middle of the cake]  follow the recipe at the end of the sponge cake recipe and to this add the sieved pulp of  3 passionfruit.

To make the glaze mix [on the top of the cake] mix together the pulp of 2 passionfruit with enough sieved icing sugar to make a sticky glaze and pour it over the cake.  If you fancy having some seeds in the pulp to add interest then push the seeds around in the sieve with a metal spoon until they look nice and shiny and then add them to the glaze.

My cake looked a little plain, so I rooted around in my goodie draw and found some left over lemon and organge jellies and added them on top
.

Thursday, 12 April 2012

Easter 2012 - Easter nests, Easter Cake and a great Easter Dessert

I'll let these photos of Easter baking 2012 speak for themselves:


These very more-ish little treats were made by mixing together melted dark chocolate, melted milk chocolate [equal amounts], rice crispies, toasted coconut, butter and syrup.  I kind of guessed the amounts.  I topped them with tiny mini eggs, mini eggs, toasted coconut and hundreds and thousands.


Lemon sponge cake with lemon curd buttercream icing.  Decorated with edible rice paper daisies and mini-eggs

For this cake I used my trusty Victoria Sponge Recipe. Adding lemon zest to the cake and two large tablespoons of lemon curd to the butter cream icing.  I also added some yellow food colouring to the icing to give it a lovely pastel yellow colour.

Lemon Meringue Roulade filled with fresh cream, fresh raspberries and lemon cured - recipe here

Sunday, 1 April 2012

Foolproof Classic Victoria Sponge Cake

With a few easy tricks [revealed in this recipe] you can bake a wonderful sponge cake certain it will turn out light as a feather each and every time.

At the end of the recipe I give you lots of tips on what else you can make with this basic recipe.


Ingredients

220g of very soft butter
220g caster sugar
4 medium eggs, lightly beaten
220g self-raising flour - to make this recipe gluten-free I used Doves Self-Raising Flour
1/2 teaspoon of baking powder
Up to half a cup of milk
1 tsp vanilla essence
Method

Preheat your oven to 180°C, gas mark 4 (the temperature at which most cakes are baked). Line the bottom with greaseproof paper and grease the sides of two 20cm-diameter sponge tins.

Sift the flour and baking powder into a bowl and set to one side.

A sponge is made by the creaming method; that is, the fat and sugar are creamed or beaten together until light and fluffy before other ingredients are added. It's important to beat the butter and sugar well, as this incorporates lots of air which makes the cake light. Begin with very soft butter [I soften mine in the microwave on "warm" until it's almost melting] add the sugar and beat with an electric whisk for up to 5 minutes, until fluffy and pale. This is the secret to a very light sponge.

Add the vanilla to the beaten egg.

Now add the beaten eggs and flour in the following way:

Add a quarter of the egg and either fold in by hand with a large stainless steel spoon or mix on the lowest speed of your electric mixer until completely incorporated. At the very first sign of curdling or separating, add a tablespoon of the sieved flour.  Adding the remaining egg in three more batches,  along with a tablespoon of flour if and when necessary.

Add the remaining flour and fold in with a large metal spoon. The cake batter should be wet enough so that a scoop of the mixture will slowly fall off a spoon when held sideways, rather than running off easily, or sticking completely.   If this doesn't happen to your mixture, very slowly incorporate tablespoons of milk - by hand -  until it does so.  I've been known to add up to 6 tablespoons in mine.
This is the secret to a very moist sponge.

Do remember:  not all flours are the same and not all creamed ingredients are the same each time.  For instance, gluten free flour can require more milk to get the right consistency.  This is why baking isn't an exact science and getting to know what works for your ingredients and oven can take a few tries.

Divide the mixture between the two greased cake tins, smoothing the tops. Put in the oven and bake for 20 minutes. The cakes should look well-risen and golden brown, and should have pulled away slightly from the sides of their tins. To make sure the cakes are done, push a metal or wooden skewer into the middle of one. It should come out clean the cake is done. If there's sticky-looking cake mix on it, bake for 5 minutes more, then repeat the test.

After 10 minutes cooling in the tin, turn the cakes out on to a wire rack (if you turn them out when hot, they may break up). Put the smoothest-looking cake right side up (this will be the top of the finished cake) and the other upside down, so its domed top flattens slightly. Leave to cool completely.

Buttercream Icing:

50g unsalted butter - make sure it's very soft
100g icing sugar
Contents of one vanilla pod - slit and scraped with a knife
or 1 tsp of vanilla essence

Sift the icing sugar into a bowl and put to one side. This ensures the icing is very light and doesn't clump together.

- Add the butter to a 2nd mixing bowl
- Add about a quarter of the sugar
- Mix on a slow speed to start off with and increase the speed gradually
- Add the balance of the butter in batches
- Add the vanilla

Beat on a high speed for at least five minutes - this will make it light and creamy

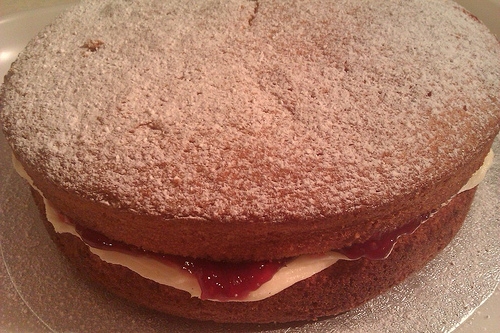
To assemble the cake:

- spread the bottom layer of cake with the butter cream mixture
- spread the underside of the top layer of cake with either raspberry or strawberry jam
- carefully sandwich the to layers together
- using a sieve, sprinkle icing sugar over the top

This my "go to" cake recipe.  It's also endlessly adaptable - both the cake and icing.

Cake variations:

Lemon cake:  add the zest of one large or two small lemons to the cake batter
Orange cake:  add the zest of one orange to the cake batter
Chocolate cake:  mix 2 heaped tablespoons of good quality cocoa powder with 4 tablespoons of warm water and add to the cake batter after the last addition of egg mixture
Coffee cake:  mix 2 teaspoons of instant coffee granules with 2 tablespoons of warm water and add to the cake batter after the last addition of egg mixture

Butter cream variations:

Even for these variations I still keep the vanilla in the icing, as I think it adds a lovely dimension to any additional flavouring.  All the flavourings are added halfway through the mixing process.

Lemon icing:  add the zest of half a lemon to the butter cream halfway through mixing / or add two heaped tablespoons of lemon curd to the butter cream mixture and mix well
Orange icing:  add the zest of half an orange to the butter cream
Chocolate icing:  add two heaped teaspoons of good quality cocoa powder, that has been mixed with three teaspoons of water to make a runny paste
Coffee icing:  add one heaped teaspoon of good quality instant coffee granules that has been mixed with two teaspoons of water to make a runny paste 


Thursday, 16 February 2012

Coffee and Walnut Cake


I wonder who discovered that coffee and walnut is a marriage made in heaven? The Italians I hazard? I mean coffee and peanuts, no thanks, coffee and pecan nuts, not really, coffee and hazelnuts ….. maybe? Mr Ferrero Roche, one of the richest men in the world made his fortune on the marriage of chocolate and hazelnut paste.

For this cake I use very strong espresso, none of that powdered muck and certainly nothing containing chicory. Growing up in South Africa proper coffee wasn’t available until the mid-80’s – yes darkest Africa was kind of life the UK in this respect – a very late-comer to the ground coffee bean. Over time I’ve become a total coffee snob and won’t drink instant unless I’m totally desperate. Like I’m almost falling asleep at work and the cafeteria is closed.

My favourite coffee is the one I drink every morning. Which is Sainbury’s Taste The Difference Tarrazu from Costa Rica. I used to drink Lavazza red label but now I find that too strong. Every morning I fire up my trusty Bialetti espresso maker and make two big servings of espresso. I pour this into two mugs filled quarter of the way with hot milk and vanilla flavoured sugar. I can’t function before I’ve taken my coffee back to bed and spend at least 15 minutes sipping my coffee and reading my current book. This ritual sets me up for the day, every day.


Back to the cake…. Last year for Red Nose Day we had a massive cake sale at work and a colleague brought in a delicious Coffee and Walnut cake. It’s not a cake I’ve ever made, who knows why…. so I was spurred on to give one a go as soon as possible. She kindly gave me her recipe which is this one from the Daily Mail. Personally I don’t think raisins should be in this cake, so I left them out.

I’ve made a few other adaptations, as I always do -  here’s the recipe:


Makes 8-10 slices

FOR THE SPONGE

• 175g unsalted butter softened plus extra for greasing

• 175g caster sugar

• 3 large free-range eggs beaten

• 3 tbsp milk

• 175g self-raising flour [I used Doves Gluten Free self-raising flour]

• 1 tsp baking powder

• 2 tbsp of cooled strong espresso / or 2 tsp instant coffee granules dissolved in 1 2bsp boiling water

• 80g walnut pieces chopped into small chunks (I bash mine in a ziploc bag with a rolling pin)

FOR THE TOPPING

• 150g unsalted butter, softened

• 300g icing sugar

• 3 tbsp of cooled strong espresso / or 3-4 tsp instant coffee granules dissolved in 3 tbsp boiling water

• 60g walnut pieces for decoration - either in halves or chopped up smaller depending on you want to decorate the top


Preheat the oven to 200C/180C fan/gas 6. Lightly grease a 22cm round, 5cm deep cake tin and line the base with parchment paper. You can also use a medium size oblong tin [as in the picture]


Sieve the flour and baking powder and put to one side. To make the sponge, beat together the butter and sugar, until pale and fluffy. Aim for a full 5 minutes of beating if you can. The fluffier the mixture the lighter the cake. Add the eggs and milk a little at a time, beating after each addition. If the mixture looks like it’s starting to curdle add a tablespoon of flour and beat on slow for a few seconds. Fold in rest of the flour with a large metal spoon, then stir in the coffee. When this is all well mixed, gently fold in the walnut pieces.


Tip the cake mixture into the prepared tin, smooth off the top and bake in the oven for 30-35 minutes. The cake should spring back to the touch of a fingertip and be slightly shrinking away from the edge of the tin. Remove from the oven and leave to cool in the tin for 5 minutes then turn out on to a wire rack.


Meanwhile, make the topping. Beat the butter in a mixing bowl until soft, then sift in the icing sugar, add the dissolved coffee granules and beat as hard as you can for as much as 10 minutes, if you can bear it, to make it really light and fluffy.


When the sponge is completely cool, remove it from the tin and add the topping. Either smooth it over with a knife or be extravagant and pipe in a fancy style over the top, finishing off with the walnut pieces arranged decoratively all over.

In the picture above you may notice that there is no half walnut prettily decorating the slice.  That's because I decided to experiment and finely chop up the walnuts and incorporate them into the icing.  Warning!  don't do this - it makes the icing difficult to spread.  Most definitely rather decorate the cake with the walnut halves.  It looks so much prettier that way too!


Tuesday, 14 February 2012

Lemon and Blueberry Cake with Lemon Drizzle


Lemon and blueberries are a match made in heaven.  I often get the craving for an intense hit of lemon, a burst of gooey blueberry and a hint of sugary sweetness. 

What's great about this cake is that it contains ground almonds, so it's super-moist. Also, ground almonds have the health benefit of being lower in GI [fuller for longer theory] and as we all know nuts are healthy for you.

Recipe:

140g self-raising flour [I use Dove's gluten-free self-raising flour]

140g ground almonds

140g butter [I use half butter and half baking spread to cut the artery clogging animal fat]

140g caster sugar

2 eggs

1 teaspoon vanilla extract

Finely grated zest and juice of two lemons

3 tablespoons of milk [I used a little extra milk as I use gluten free flour which can make cakes a little dry but it you're using normal flour you may not need it].  The idea is for the mixture to be quite stiff but certainly not like a paste

2 tablespoon of lemon juice

20cm springform cake tin. Line the bottom with greaseproof paper

For the drizzle:

3/4 cup of icing sugar - sieved to get rid of any lumps

1-2  tsp of lemon juice

Method:

Turn the oven on to 180 degrees / 160 for fan ovens

Make sure the butter is very soft. I take butter from the fridge and put it in the microwave on "warm" in 20 second spurts until I can easily stick my finger in it and leave a hole]

Sieve both the ground almonds and flour. I put them in the sieve together. The flour goes through easily but the almonds take longer. If there are some stubborn flakes at the end that won't go through I sprinkle them over the rest from a height to incorporate some air.

Cream together the butter and sugar until very pale and fluffy. For at least three minutes, five is even better, add the vanilla and lemon zest towards the end.

Break in the eggs one at a time into the creamed mixture and beat for a few seconds on a slow speed to incorporate. Add a few tablespoons of the flour if it starts to curdle or separate.
Add the rest of the flour and almonds in several batches beating on a slow speed for a few seconds after each addition.

The mixture will be quite stiff but that's ok.

Add the two tablespoons of lemon juice.  [At this stage, if you're using gluten-free add the three tablespoons of milk and beat for a further few seconds].

Spoon half the mixture into the cake tin spreading it out evenly with the back of a spoon.

Sprinkle over the blueberries - making sure that you distribute them fairly evenly.

Spoon over the rest of the mixture and spread it evenly with the back of a spoon.

Bake for 40-50 minutes in the centre shelf of the oven

Test the cake after 40 minutes by inserting a toothpick or skewer into the middle. It should come out clean.

Drizzle: 
 
Once the cake has completely cooled put the icing sugar in a small bowl and one teaspoon at a time stir in the lemon juice.  You'll need to stir quite a bit between each addition as it takes a while for the icing sugar to melt.
 
You want the consistency to be thick.  Almost so thick that you could write with it.  [Mine in the pic below isn't a good example as the drizzle turned out too thin :-( ]
 
Using a small self-seal bag spoon the mixture into one of the corners and seal.  Push all the drizzle down into the corner.  Taking some scissors make a tiny incision on the corner.  The drizzle should pleasingly come out in such a way that you can make lines with it.  Without being too fussy drawn lines over the top of the cake.


Wednesday, 14 December 2011

Easy Dessert - Lemon Meringue Roulade


If you're looking for a light dessert that's big on flavour,  then look no further.  It's dead easy and looks mighty impressive.  Perfect to serve at Christmas or as a summery pudding.

This recipe taken from the British Lion Eggs website is now a firm family tradition at both Christmas and Easter.


·                           4 large egg whites
·                           225g/8oz caster sugar
·                           1 tsp almond essence
·                           1 tsp raspberry or white wine vinegar
·                           50g/2oz ground almonds
·                           1-2 tbsp icing sugar, sifted
·                           6 tbsp lemon curd
·                           300ml/1/2pt crème fraiche
·                           1 tbsp toasted flaked almonds
·                           A few fresh raspberries to decorate
·                           Raspberry or mango coulis to serve

1.       Preheat the oven to 170C/325F/Gas Mark 3, 10 minutes before baking. Line a Swiss roll tin with a single sheet of greaseproof or baking paper and reserve.
2.       Whisk the egg whites until stiff and standing in peaks then gradually whisk in the sugar 1 spoonful at a time. When all the sugar has been added, carefully stir in the almond essence, vinegar and then the ground almonds. Mix lightly together.
3.       Turn into the lined Swiss roll tin smooth the top and tap the tin lightly on the work surface to remove any air bubbles. Bake in the preheated oven for 30-35 minutes or until the top is pale golden and feels firm and set. Remove from the oven and leave until cold.
4.       When ready to serve, whip the crème fraiche until thick, reserve. Invert the cooled roulade onto a large sheet of greaseproof or baking paper, sprinkle with the icing sugar and carefully strip off the lining paper. Spread with the lemon curd and then the crème fraiche. Leave for a few minutes to allow the roulade to soften then carefully roll up. (You will find that the roulade cracks slightly on rolling.)
5.       Place on a serving platter, sprinkle with the toasted almonds and decorate with the raspberries and serve.

Cooks note:  don't worry if the meringue cracks when you roll it up - it just adds to the "yule log" effect.  Plus a bit of icing sugar sprinkled over through a sieve covers up a multitude of sins.

Gluten-free Christmas Tiffin Road & Amaretti Tiffin Road


This recipe is a cross between tiffin and rocky road, so I call it Christmas Tiffin Road.  Instead of marshmallows I use chopped up Crunchies Bars, which gives it even more texture.  These little treats are very easy to make and make wonderful homemade gifts but make sure you keep a batch for yourself because they're highly addictive!

To make a different kind of tiffin road [for those who aren't gluten intolerant] you can use amaretti biscuits and white chocolate instead. As I did in the photo above.

250g dark chocolate, chopped or bashed in a freezer bag with a rolling pin
150g milk chocolate, chopped or bashed in a freezer bag with a rolling pin
175g butter – salted or unsalted – I use salted
4 tbsp golden syrup
200g gluten-free shortbread biscuits – I used Waitrose Shortbread Biscuits - bashed in a freezer bag into biggish chunks -  keep the rubble
150g brazil nuts, chopped into chunks – one nut cut into about three pieces
150g sour cherries or dried cranberries – I prefer sour cherries
125g pistachio nuts – left whole
3 Crunchie bars – bashed into small chunks –  keep the rubble
White chocolate stars for decoration or edible glitter or any other festive decoration

Line a 25cm/10in x 30cm/12in baking tray with greaseproof paper

  1. Place both chocolates, butter and golden syrup into a heavy-based saucepan.  Cook over a low heat to melt, stirring occasionally

  1. Take the pan off the heat and stir in the crushed biscuits and nuts

  1. Add the berries and stir

  1. Lastly, add the Crunchie bits and fold in [make sure you do this last, as if the mixture is still too war the honeycomb bits will dissolve]

  1. Smooth the surface as much as possible but it will still be “rocky”

  1. Sprinkle with white chocolate stars, however only do this once the mixture has cooled a bit, otherwise they may melt

  1. Refrigerate for two hours or until mixture has just set but is still soft enough to cut

  1. Remove block of rocky road from the baking tray

  1. If using edible glitter, sprinkle with glitter

  1. Using a very sharp knife cut into approx. 24 pieces

    Tuesday, 6 December 2011

    Gluten-free Mince Pies

    What happens when you cross a person who was brought up a Jehovah's Witness [in case you don't know they don't celebrate Christmas] with someone, who at 46, loves Christmas as much as a 4 year old? 

    The answer is........... you get a lot of compromise going on.  Compromise and negotiation which would put United Nation peace negotiators to shame!

    Here is a prime example of how we view Christmas - my favourite Christmas film is Bad Santa - his favourite film is "Elf", followed closely by "Miracle on 42nd Street".  That pretty much sums things up nicely.


    Our first Christmas together Pixie bought me [at the age of 40] my first ever advent calendar.  Not just any old cardboard calendar from the supermarket.  Oh no, a proper fabric, embroidered calendar with little pockets, which he proceeded to fill - on 01 December - with a mixture of individually wrapped tiny chocolates.  He still has the advent calendar from his childhood. 

    Every year, since we met 6 years ago,  I've been de-humbugged ever so slightly.  I can't say I look forward to it exactly but I don't dread it quite so much.

    Last weekend I baked my very first batch of gluten-free Mince Pies using this recipe from BBC Good Food.  They turned out great - as you can see below.

    Cooks tips:

    My one tweak [and I always make a tweak it seems] is that I find fruit mincemeat too sweet, so I substituted some of the mincemeat with dried cranberries to add some tartness.  It worked a treat. 

    As suggested in the recipe, I used Sainsbury's Finest fruit mince meat.  Which is for all intents and purposes gluten-free.  There was an allergy warning on the label was that it wasn't 100% guaranteed gluten-free because of the manufacturing environment.  So for those who are ultra gluten intolerant you should look for a totally gluten-free version.


    p.s am I the only one who finds Billy-Bob Thornton sexy?

    Thursday, 17 November 2011

    Easy and foolproof Risotto - Bacon and Leek


    I first time I tasted risotto was about 16 years ago.  I was vegetarian at the time and a friend made me porcini risotto.  I absolutely loved it!   I took to ordering it in restaurants because often it was the only decent vegetarian option on the menu but never tried to make it for myself.

    A couple of years later I started going out with an Italian.  His family lived in a town outside Milan and owned a Deli.  I literally had the contents of an entire Italian Deli at my disposal but because I was a devout veggie I didn't touch any of the lovely cured meats, homemade ravioli and the like.  Now I must tell you that I wasn't a veggie because I disliked meat.  Oh no, I bloody loved the stuff - in fact salami is in my top ten foods.  I was the only veggie I know who loves meat and spent 12 years denying myself the pleasure of it. 

    Each time I visited Italy it was an exercise in deprivation and frustration.  His family thought I was odd anyway.  I had very short hair - think Dolores O'Riordan from the Cranberries - and my shoe choice of the time was Vegan Doc Martens.  This did not sit well with the fur-wearing, stilleto teetering, long "blonde" haired clones.  Anyway I digress...........


    The next time I tasted risotto my "father-in-law", who was a wonderful cook, make me a totally plain risotto topped with shavings of truffle.  Oh my god - it was sensational!  Truffle is in my food top five.  So my love affair with risotto began and it's never ended.  The recipe below is one of my favourites.

    As to my rather long foray into vegetarianism........

    Eventually it all got too much for me and I had to give in.  Nowadays I eat meat with gay abandon and make up for all those years of ordering crappy vegetarian options in swish restaurants.  Nowadays I buy organic and am still concerned about animal welfare.  To all those real life-long veggies I'm a heretic but what can I say ...... I'm weak.

    [Serves 4]

    300g Carnaroli or Arborio risotto rice

    3 x generous knobs of butter and a tiny splash of olive oil

    1 large white onion or two medium

    2 cloves of minced garlic

    250ml of dry white wine – room temperature is better than cold

    1 litre of chicken stock [I use one and a half Knorr  chicken stock cubes]

    3 large or 4 medium leeks – sliced approx. 3 mm thick

    1 packet of smoked bacon [6 slices] – grilled until well done and with the fat cut off

    1 heaped cup (250ml] of grated parmesan cheese – plus extra for serving

    Freshly ground black pepper

    Finely chopped parsley to garnish

    Method:

    Finely chop the onion and mince the garlic

    Put into heavy bottom pot with first knob of butter and add a small splash of olive oil

    Saute until transparent over a very low heat – approx 10 minutes – stirring very few minutes

    In the meantime ……

    Grill bacon until well done and the fat is quite brown.  Cut off fat using scissors and chop or cut into small-ish bit size pieces – set aside

    Saute the sliced leek with the second knob of butter - for now more than a few minutes, they should still be a little crunchy as they will continue to cook once added to the risotto

    If using a stock cube make up stock with boiling water , if using fresh stock bring to boil, either in microwave or in a separate pot on the stove

    Add rice to onion and garlic mixture and turn up heat from low to medium – stir rice for 2 minutes until well coated with butter and rice is just starting to turn transparent

    Set a timer for 15 minutes – then immediately

    Add wine and stir rice continuously until the wine has been absorbed by the rice – heat should be medium, so that the rice bubbles nicely but not vigorously

    Add a generous splash of stock [about a soup ladle full] and stir until almost completely absorbed by the rice


    Continue in this way until the timer goes off – stirring all the time

    Now do the bite test – the rice should have a little bit of bite in the middle and also remember the rice will continue to cook once it comes off the heat and you stir in the bacon and leeks

    Stir in the bacon and leeks and once combined add the grated parmesan cheese

    Add a generous grinding of black pepper

    Stir a few times to combine and then add the final knob of butter

    Stir a few times and leave to rest for two minutes

    Serve in bowls with a generous sprinkling of parmesan cheese and a sprinkling of parsley


    Cooks tips:

    I prefer to add all the wine first, as I feel this give the rice a nice flavour

    I prefer to use smoked bacon because I love the smokiness and it goes really well with leeks


    I don't add extra salt because the stock cube and parmesan cheese make it salty enough for my taste

    If you've ordered risotto in a number of restaurants you'll know that everyone seems to have their own interpretation of how dry or wet a risotto should be.  Personally I like mine not to be stodgy.  Kind of like if you stood a teaspoon up in a pile of it, it would fall over slowly as opposed to standing up straight.

    Remember, when you add the parmesan to the rice at the very end it causes the mixture to stiffen - so it's wise to have it runnier than you'd ideally like before you add the parmesan

    Adding a generous knob of butter at the end gives the risotto a silken texture.  The key is to only stir it a few times [some purists say three times in a clockwise motion] so as not to overmix it and potentially ruin the texture

    Risotto purists believe in a resting period - I'm not 100 sure why?  Maybe someone can enlighten me?    I imagine that the italians know what they're talking about when it comes to this dish - so I just do it ;-)


    Tuesday, 15 November 2011

    Arrabiata Pasta Sauce with Peppers


    Pixie loves peppers and Pixie loves pasta and Pixie loves chilli.  So this my Pixie Pleasing creation - a cross between pepperonata and arrabiata sauce.  I've christened it Pepperbiata.

    The chopping of the peppers can be a faff but this recipe makes a big batch.  So for the two of us we get three generous servings out of one lot of tedious chopping.


    Serves 6
    • 2 red peppers – chopped into stubby matchsticks
    • 2 yellow peppers - chopped into stubby matchsticks
    • 2 orange peppers - chopped into stubby matchsticks
    • 1 very large or 2 medium white onions – finely chopped
    • 3 cloves of garlic -  minced
    • 2 -3 red chillis – finely chopped  [pips included] – not the fiery Bird’s Eye chilli that you’d use in Indian curry but the milder variety found in UK supermarkets which are actually raw Jalapeno chillis
    • 4 tablespoons of olive oil – this may seem like a lot but it is integral to the flavour and texture of the sauce
    • 1 bottle passata [approx. 690g - sieved tomatoes]
    • 2 x 400g tins  of chopped tomatoes
    • Heaped tablespoon of sugar
    • Salt and freshly ground black pepper
    • 1 x heaped teaspoon of cornflour dissolved in 2 tbsp of water
    • Freshly grated parmesan cheese
    • Torn basil leaves to garnish

    ·        Gently fry onions and garlic in olive oil until transparent – approx. 10 minutes

    ·        Add chilli and fry for another minute

    ·        Add peppers - turn up heat and fry for about 5 minutes, stirring continuously

    ·        Add passata and tins of tomatoes and stir everything together

    ·        Add sugar, salt and pepper and stir

    ·        Once bubbling turn the heat down low and simmer for 30 – 40 minutes

    ·        Add the cornflour mixture and stir through and simmer for another 5 minutes

    ·        Serve on the pasta of your choice and sprinkle liberally with parmesan cheese

    Cooks notes: 

    ·        the idea of adding the cornflour is to prevent the sauce from separating once mixed into the pasta.  I really don’t like any watery residue on the plate or bowl.  It also helps to give the sauce a silkier consistency

    ·        this sauce tastes even better the next day or even up to 3 days later as the flavours have time to meld together

    ·        this sauce freezes really well

    Sunday, 30 October 2011

    Venetian Carrot Cake with Tipsy Marscapone


    The carrot cake has a long and distinguished history, hailing from the Arab speaking world in the 10th century, on to  the Middle Ages and then finally gaining popularity again during the 2nd World War when rationing meant no sugar to bake with.

    According to Nigella this recipe hails from the Jewish Quarter in Venice and thanks to the inclusion of olive oil, pine nuts  and marscapone has a distinctly Italian feel to it.

    I first saw Nigella make this recipe on her series Kitchen.  I've made it many times and it's never let me down.  The complexity of flavour never fails to impress.  Plus it's a healthy option because it uses olive oil, only half a cup of sugar and lots of vege.  An all round winner.

    Thanks to only using ground almonds in this recipe this carrot cake is incredibly moist and gluten-free.  The rum soaked raisins and the booze-spiked marscapone,  make this cake feel more like a sophisticated, adult dessert than simply a tea time favourite. If you're not too keen on carrot cake then please try this one as it's quite a departure from normal carrot cake.

    Here is Nigella's recipe:

    Ingredients

    For the carrot cake
    For the mascarpone cream (optional)

    Preparation method

    1. For the carrot cake, preheat the oven to 180C/350F/Gas 4. Line the base of a 23cm/9in round springform cake tin with re-usable non-stick silicone liner or baking parchment and grease the sides with olive oil.
    2. Toast the pine nuts by browning in a dry frying pan; the oven alone is not enough to scorch out the paleness. Set aside.
    3. Grate the carrots in a processor (for ease) or with a coarse grater, then sit them on a double layer of kitchen paper and wrap them, to soak up excess liquid. Set aside.
    4. Put the golden sultanas in a small saucepan with the rum, bring to the boil, then turn down and simmer for 3 minutes.
    5. Whisk the sugar and oil until creamily and airily mixed.
    6. Whisk in the vanilla extract and eggs and, when well whisked, fold in the ground almonds, nutmeg, grated carrots, golden sultanas (with any rum that clings to them) and, finally, the lemon zest and juice.
    7. Scrape the mixture into the prepared cake tin and smooth the surface with a rubber spatula. The batter will be very shallow in the tin.
    8. Sprinkle the toasted pine nuts over the cake and put it into the oven for 30–40 minutes, or until the top is risen and golden and a skewer inserted into the centre comes out sticky but more or less clean.
    9. Remove from the oven and let the cake sit in its tin on a wire rack for 10 minutes, then unspring and leave it on the rack to cool.
    10. For the mascarpone cream, mix the mascarpone with the icing sugar and rum.
    11. To serve, transfer the cake to a plate. Put the mascarpone cream in a bowl to spoon alongside the cake, for those who want.

      Cooks note:

      I use Grand Marnier instead of rum in both the raisin liquor and the marscapone, as GM has an orange flavour and therefore adds another dimension to the flavour.

      I make sure I use 250g of grated carrot as it makes the cake that little bit bigger and moister

      I don't bother to toast the pine nuts first, I just sprinkle them on top and they go golden brown all on their own


    Wednesday, 5 October 2011

    Mississippi Mud Pie


    The first time I tasted Mississippi Mud Pie I thought I’d died and gone to heaven. I was 22 years old and on a trip to Kauai, Hawaii with the American family that I was au-pairing for. We went to this wonderful hotel one evening just to have dessert. If my memory serves me correctly I think I may have become so effusive over the beauty of the concoction that my lovely boss ordered me another slice.

    I remember ordering it whenever I saw it on the menu during the duration of my U.S sojourn but it never quite lived up that “the first time”. I was recently looking for dessert inspiration online and happened upon a recipe for MMP – it brought the memories flooding back for me and I was gripped by the urge to make one.

    Well I did and it was delicious. Who says retro-80’s food can’t make a comeback? It turns out that Pixie always used to order it back in the day and was delighted at the prospect of trying a homemade version.

    The recipe I used below is from the BBC food site.   I adapted it to be gluten-free by using gluten-free Borboun Biscuits for the base. Easy as!

    Ingredients

    For the base

    • 300g/10½oz bourbon biscuits, crushed

    • 75g/2½oz butter, melted

    For the filling

    • 85g/3oz dark chocolate, minimum 70 per cent cocoa solids

    • 85g/3oz butter

    • 2 free-range eggs

    • 85g/3oz muscovado sugar

    • 100ml/3½oz double cream

    For the fudge sauce

    • 150g/5½oz dark chocolate, minimum 70 per cent cocoa solids

    • 150ml/5½fl oz double cream, plus extra to serve

    • 3 tbsp golden syrup

    • 175g/6oz icing sugar, sieved

    Preparation method

    1. Preheat the oven to 180C/365F/Gas 4.

    2. Mix the biscuits and melted butter together in a bowl. Press the mixture into the base and sides of a 23cm/9in springfrom tin. Chill in the fridge for 10 minutes.

    3. For the filling, melt the chocolate and butter together in a heatproof bowl set over a pan of simmering water. (Do not let the base of the bowl touch the water).

    4. Meanwhile, whisk the eggs and sugar together in a bowl for 5-6 minutes, or until thick and creamy. Fold in the cream and melted chocolate mixture. Pour into the chilled springform tin and bake in the oven for 40-50 minutes, or until just set. Remove from the oven and set aside to cool completely.

    5. Meanwhile, for the fudge sauce, heat all of the fudge sauce ingredients in a saucepan, stirring regularly, over a medium heat until the mixture is smooth and glossy. Set aside to cool for 5 minutes.

    6. Spread the sauce over the cooled pie and chill in the fridge for 20 minutes. Serve with double cream.

    Cooks tips and observations:
    • The fudge topping didn't set very quickly - so I'd say it needs to be in the fridge for at least couple of hours - I left it to chill overnight
    • I used a large fork to make the swirly pattern
    • I covered the pie with foil for the entire baking period to prevent it from getting too brown on top
    • I took it out of the oven after 35 mins - as my oven is quick and it also continues to cook once it comes out
    • As you can see, I didn't push the biscuit mixture up the sides of the tin as I find it never comes out even
    Make this and be prepared for chocolate heaven!


    Thursday, 22 September 2011

    Apple Cake


    Colleagues have taken to bringing in oodles of cooking apples from their gardens for everyone.  Which is a lovely gesture and somewhat forced me to find a recipe to use them in.  This cake turned out brilliantly.  The bake has a dense yet light texture - thanks to the yoghurt I think?  

    This recipe is an adaptation of a Waitrose card recipe:

    Preparation time: 20 minutes
    Cooking time: 60 minutes


    Serves: 8

    Ingredients:

    2 apples

    225g demerera sugar

    200g butter, softened [I used soft light brown sugar, as it's easier to get light and fluffy with the butter]

    3 large eggs, beaten

    200g  self-raising flour

    150g pot Natural Yogurt

    For Crème Fraîche:

    500g  Half Fat Crème Fraîche

    2 tbsp  Honey

    ½ tsp organic cinnamon

    Method:

    Preheat the oven to 180°C, gas mark 4. Lightly grease a round 20cm loose-bottomed cake tin, line the base with baking parchment, then grease the top of the parchment.

    Core the apples and slice thinly (no need to peel). Put them in a large bowl, add 25g of the sugar and toss well to coat. Arrange the slices in the tin, overlapping them slightly to form circles.

    Beat the butter and remaining sugar together until light and fluffy, using an electric hand whisk or wooden spoon. Add the eggs, a little at a time, until they are fully incorporated and the mixture is smooth. If the mixture begins to curdle, simply add a spoonful or two of the flour and continue to add the egg.

    Fold in the remaining flour and yogurt, then carefully spoon the mixture over the apples. Place the cake tin on a baking tray and bake for about 1 hour, or until golden and springy to the touch. Remove from the oven and leave to cool for 20 minutes or so. Turn the cake out onto a wire rack and leave to cool completely.

    Spoon the crème fraîche into a serving bowl. Beat the honey and cinnamon together, then stir gently through the crème fraîche. Chill. Serve the cake in slices, with the honeyed crème fraîche.

    Cooks tips:

    As you can see from my picture the sides browned a little too much.  My fan oven is the bane of my life in this respect as most things seem to come out a bit too brown around the sides.  So for the last ten minutes watch it like a hawk.  Next time I'll take mine out 5 minutes earlier.

    I also made an error of whipping and not folding the honey and cinammon into the creme fraiche.  This resulted in a runny, double cream consistency which tasted nice but couldn't be spooned on the plate next to the cake. There is a definite reason for mixing the honey and cinammon together first and then gently folding into the creme fraiche.  Sometimes I wished I was more obedient ;-)

    Next time I think I might add cinnamon to the cake batter mixture - because I love cinammon with apple and just having some in the creme fraiche doesn't infuse the cake with the flavour.